General · Linux · MAC · Mysql · NoSql

Guide to install MongoDB on MAC machine

Introduction

As per wikipedia, MongoDB is a source-available cross-platform document-oriented database program. Classified as a NoSQL database program, MongoDB uses JSON-like documents with optional schemas. MongoDB is developed by MongoDB Inc. and licensed under the Server Side Public License. So In this article, I am gonna guide the ways to install MongoDB on MAC machine.

Steps to install MongoDB on MAC with Homebrew

  • Install Homebrew (Homebrew is a package manager on MAC which takes care of installing most of the open source softwares)
/usr/bin/ruby -e "$(curl -fsSL https://raw.githubusercontent.com/Homebrew/install/master/install)"
  • Open the Terminal app and update homebrew.
brew update
  • Find MongoDB tap.
brew tap mongodb/brew
  • Install MongoDB.
brew install mongodb-community
or
brew install mongodb
  • Before you can use MongoDB, you need to create a /data/db folder because MongoDB expects this directory (/data/db) on your machine to save the data. But Apple has already depreciated this directory on Catalina/BigSur machines and created a new volume on macOS Catalina for security purposes. So, we will create the folder in System/Volumes/Data (You can choose any folder of your choice) . Use the below command for the same.
sudo mkdir -p /System/Volumes/Data/data/db
  • Make sure that the /data/db directory has the right permissions. Then, give permissions to the folder:
sudo chown -R `id -un` /System/Volumes/Data/data/db
  • (Optional) NOTE* Make sure to link the above db path if the chosen like “/tmp/data/db” (NOT THE ABOVE ONE) by using below command
mongod --dbpath /tmp/data/db
  • Starting MongoDB

The ‘mongod’ command is used to start MongoDB but for me it doesn’t work. So, the best way to start MongoDB is now via ‘brew services’ .

brew services run mongodb-community
OR
brew services run mongodb
  • Mongo Shell

If MongoDB is running, you should be able to access the Mongo shell. Use the below command:

mongo
  • Checking if MongoDB is running
brew services list
Name                  Status  User    Plist
mongodb-community     started labuser /usr/local/opt/mongodb-community/homebrew.mxcl.mongodb-community.plist
  • Stopping MongoDB
brew services stop mongodb-community

Steps to install MongoDB on MAC by downloading it manually

  • Go to the MongoDB website’s download section and download the correct version of MongoDB.
  • After downloading Mongo move the gzipped tar file (the file with the extension .tgz that you downloaded) to the folder where you want Mongo installed.
> cd Downloads
> mv mongodb-osx-x86_64-3.0.7.tgz ~/
  • Extract MongoDB from the the downloaded archive, and change the name of the directory to something more palatable.
 cd ~/ > tar -zxvf mongodb-osx-x86_64-3.0.7.tgz > mv mongodb-osx-x86_64-3.0.7 mongodb
  • Create the directory where Mongo will store data. Please follow the steps mentioned in the 1st method of installation.
  • Run the Mongo daemon, in one terminal window run ~/mongodb/bin/mongod. This will start the Mongo server.
  • Run the Mongo shell, with the Mongo daemon running in one terminal, type ~/mongodb/bin/mongo in another terminal window. This will run the Mongo shell which is an application to access data in MongoDB.

MISC :: Aliases to make these easier

alias mongod='brew services run mongodb-community'
alias mongod-status='brew services list'
alias mongod-stop='brew services stop mongodb-community'

I hope you guys will be able to install MongoDB on your MAC machine. Happy querying 🙂

Apache Kafka · Design · General

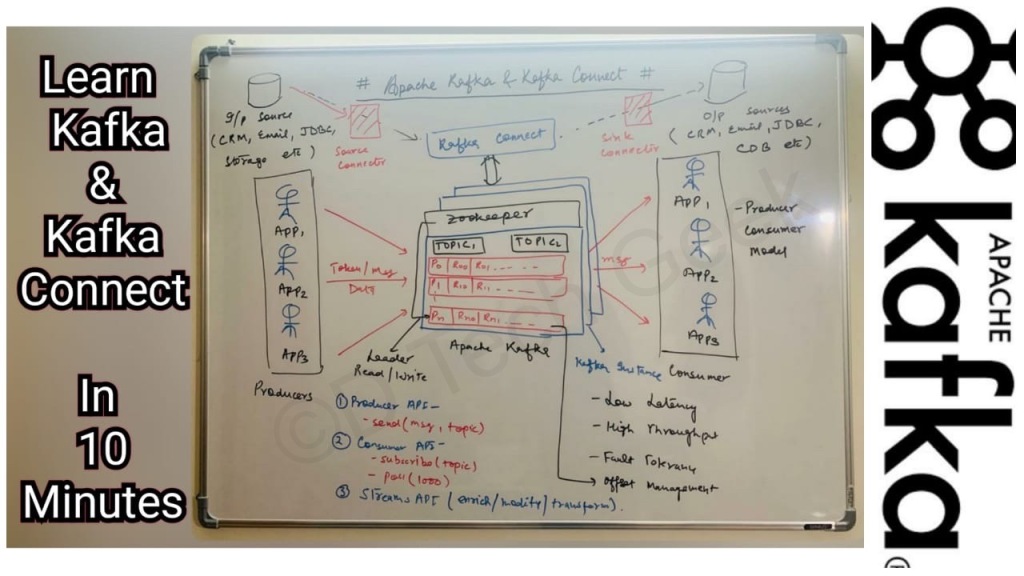
Learn Apache Kafka and Kafka Connect in 10 Minutes/ Apache Kafka and Kafka Connect for Beginners

Statement : While Designing the high scale systems , most of the times we need to queue the requests to serve it in async fashion and for that we need some scalable messaging system which can handle this much of load in Distributed Computing. On that note, this article is going to introduce you with one of the de facto industry standard messaging system that is Apache Kafka and a framework written on the top of Kafka that is Kafka Connect.

Fundamentals Covered as a part of this article :

– Kafka Topics

– Records

– Partitions

– Replications

– Offset Management

– Zookeeper

– Producer APIs

– Consumer APIs

– Streams APIs

– Producer Consumer Model

– Source Connectors

– Sink Connectors

Visual Representation of Apache Kafka and Kafka Connect

References : https://kafka.apache.org/ https://docs.confluent.io/3.0.0/connect/

Finally, I have covered everything discussed above as a part of my youtube video. In this video I am going to cover the basics of Apache Kafka and Kafka Connect in 10 minutes. In addition to it, You will visualize the beauty of various connectors used in industry by leveraging Apache Kafka and Kafka Connect. Hopefully by watching this video, you can easily go into the depth of Kafka and implement it in your products/ projects/ modules as a part of messaging system. Feel free to like the video and share your valuable feedback.

Last but not least, please don’t forget to subscribe my youtube channel. Stay updated and connected. Cheers 🙂

Design · General · Interviews

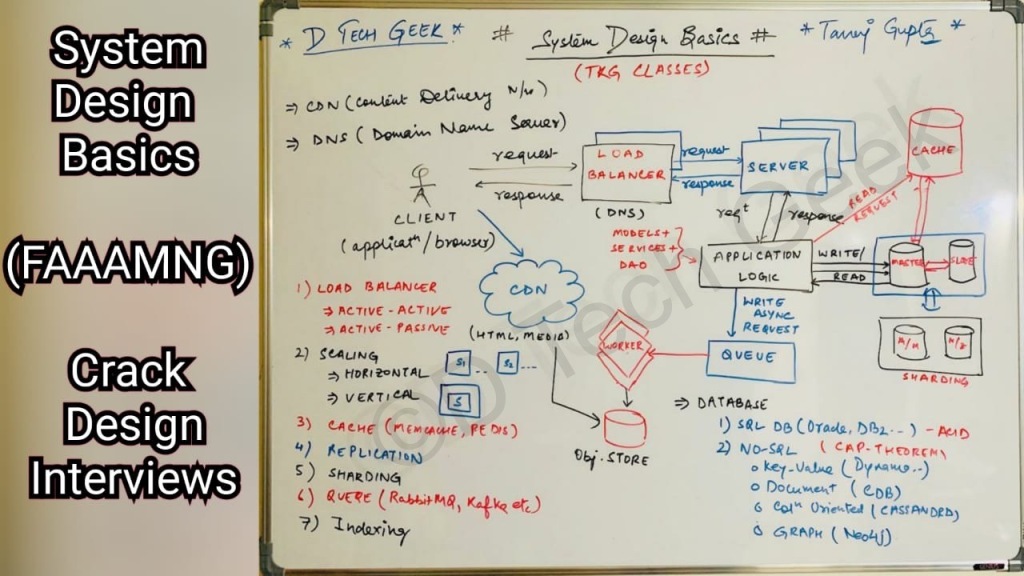
System Design Concepts & Fundamentals/ Crack The System Design Interview/ FAAAMNG Interview Preparation/ System Design Basics

Statement : Most of time, while working on the real world problems (Designing e-commerce or social platforms app etc ) we struggle with the basic System Design concepts. These basic concepts will not only help you to crack the System Design Interview but also be beneficial while designing high scale projects.

Basic Concepts Covered as a part of this article :

1. Simple Client-Server Architecture

2. Load Balancers (ACTIVE-ACTIVE or ACTIVE-PASSIVE Modes)

3. Servers (Apache Tomcat, Nginx etc)

4. Scaling (Horizontal vs Vertical)

5. Caching (Memcache, Redis etc)

6. Database (Master-Slave)

7. Replication (Replica of Master Database)

8. Sharding (Shard the data across locations)

9. Queuing Systems (RabbitMQ, Apache Kafka etc)

10. CDN (Content Delivery Network)

11. DNS (Domain Name Server)

12. SQL Databases (MySQL, Oracle, DB2 etc)

13. No-SQL Databases (Key-value Store like DynamoDB, Document Store Like Cosmos DB, Column Family Store like Cassandra/ HBASE, Graph Based Store like Neo4J etc.)

14. ACID Properties (Atomicity, Consistency, Isolation, Durability)

15. CAP Theorem (Consistency, Availability, Partition Tolerance)

16. Indexing

Visual Representation of System Design Concepts

Moreover, you are going to learn these concepts in my own way through my youtube video. So, please like the video and share your valuable feedback. Last but not least, please don’t forget to subscribe my youtube channel. Cheers 🙂

Airflow · Design · General · Linux · MAC · Mysql · postgres · Python · Windows

Building Data Pipelines through Apache Airflow (Magic of ExternalTaskSensor)

Objective 

While building the data pipeline, developers realise a need of setting up the dependencies between 2 DAGs wherein the execution of second DAG depends on the execution of first DAG. On that note, Apache airflow comes with the first class sensor named ExternalTaskSensor which can be used to model these kind of dependencies in the application.

Task Properties

The ExternalTaskSensor task has the following type properties.

PropertyrequiredTypeDescription
external_dag_idtrueStringThe dag_id that contains the task you want to wait for.
external_task_idtrueString or NoneThe task_id that contains the task you want to wait for. If  ‘None’ (default value) the sensor waits for the DAG.
execution_deltafalseStringtime difference with the previous execution to look at, the default is the same execution_date as the current task or DAG. For yesterday, use [positive!] datetime.timedelta(days=1). Either execution_delta or execution_date_fn can be passed to ExternalTaskSensor, but not both.
execution_date_fnfalseStringfunction that receives the current execution date and returns the desired execution dates to query. Either execution_delta or execution_date_fn can be passed to ExternalTaskSensor, but not both.
check_existencefalsebooleanSet to true to check if the external task exists (when external_task_id is not None) or check if the DAG to wait for exists (when external_task_id is None), and immediately cease waiting if the external task or DAG does not exist (default value: false).

With reference to Airflow terminology, Sensors are a certain type of operator that will keep running until a certain criterion is met. Sensors are derived from BaseSensorOperator and run a poke method at a specified poke_interval until it returns True. Moreover, all sensors inherit the timeout and poke_interval on top of the BaseOperator attributes. So, one can override the following type properties with respect to ExternalTaskSensor is required. 

PropertyrequiredTypeDescription
poke_intervalfalseintTime in seconds that the job should wait in between each tries.
time_outfalseintTime, in seconds before the task times out and fails.
modefalseStringOptions are: “{ poke | reschedule }“, default is “poke“. When set to “poke“ the sensor is taking up a worker slot for its whole execution time and sleeps between pokes. Use this mode if the expected runtime of the sensor is short or if a short poke interval is required. When set to “reschedule“ the sensor task frees the worker slot when the criteria is not yet met and it’s rescheduled at a later time. Use this mode if the time before the criteria is met is expected to be quite long. The poke interval should be more than one minute to prevent too much load on the scheduler.

Sample DAGs to understand the working of ExternalTaskSensor

import airflow
from airflow import DAG
from airflow.utils.trigger_rule import TriggerRule
from datetime import datetime, timedelta
import dateutil.parser
from airflow.operators.dummy_operator import DummyOperator


default_global_args = {
'owner': 'Tanuj',
'email': ['xyz@gmail.com'],
'email_on_failure': True,
'email_on_retry': True,
'start_date': datetime(2020, 6, 23)
}


dag = DAG(
dag_id = 'DependentJob',
default_args = default_global_args,
schedule_interval= '*/10 * * * *',
max_active_runs = 10
)


DependentOperation = DummyOperator(task_id='DependentOperation',dag=dag,trigger_rule=TriggerRule.ALL_SUCCESS)
Sample DependentJob DAG
from datetime import timedelta
import dateutil.parser
import airflow
from datetime import datetime
from airflow import DAG
from airflow.operators.dummy_operator import DummyOperator
from airflow.sensors import ExternalTaskSensor


args = {
'owner': 'Tanuj',
'depends_on_past': False,
'start_date': datetime(2020, 6, 23),
'email': ['xyz@gmail.com'],
'email_on_failure': False,
'email_on_retry': False,
'retries': 3,
'retry_delay': timedelta(minutes=5),
}


new DAG definition
dag = DAG(
dag_id='ExternalWorkflow',
default_args=args,
schedule_interval= '*/10 * * * *',
)

external_task = ExternalTaskSensor(external_task_id ='DependentOperation',
task_id='external_task',
external_dag_id = 'DependentJob',
dag=dag)

newjob = DummyOperator(dag=dag, task_id='newjob')

external_task >> newjob
Sample ExternalWorkflow DAG
from datetime import timedelta
import dateutil.parser
import airflow
from datetime import datetime
from airflow import DAG
from airflow.operators.dummy_operator import DummyOperator
from airflow.sensors import ExternalTaskSensor


args = {
'owner': 'Tanuj',
'depends_on_past': False,
'start_date': datetime(2020, 6, 23),
'email': ['xyz@gmail.com'],
'email_on_failure': False,
'email_on_retry': False,
'retries': 3,
'retry_delay': timedelta(minutes=5),
}


new DAG definition
dag = DAG(
dag_id='ExternalWorkWithExecutionDelta',
default_args=args,
schedule_interval= '*/15 * * * *',
)

external_task = ExternalTaskSensor(external_task_id ='DependentOperation',
task_id='external_task',
external_dag_id = 'DependentJob',
execution_delta=timedelta(minutes=5),
dag=dag)

newjob = DummyOperator(dag=dag, task_id='newjob')

external_task >> newjob
Sample ExternalWorkWithExecutionDelta DAG

Visual Understanding

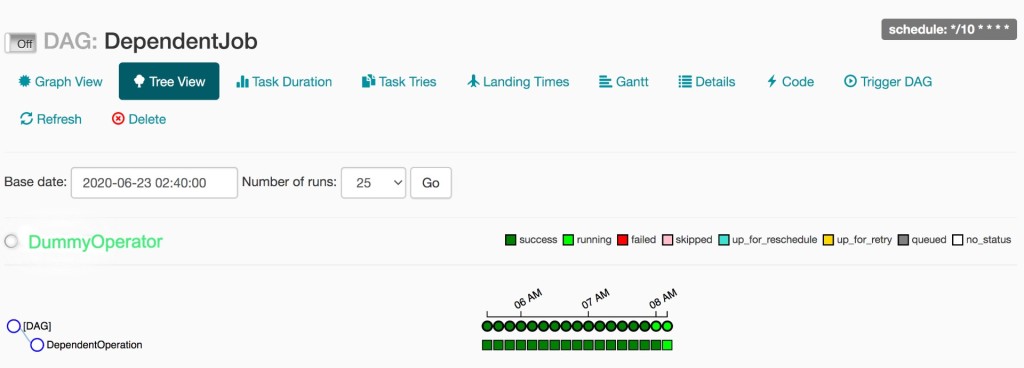
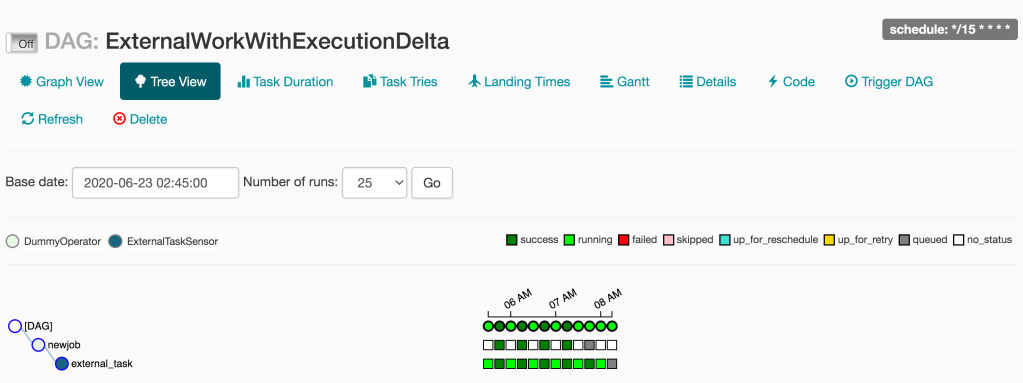
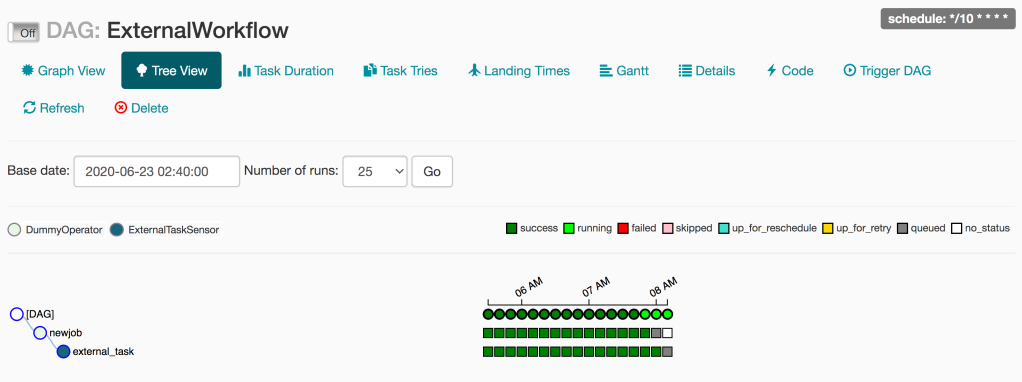
To understand the visual working of the ExternalTaskSensor, I have created two DAGs named DependentJob and ExternalWorkWithExecutionDelta same as stated in the above python blocks.

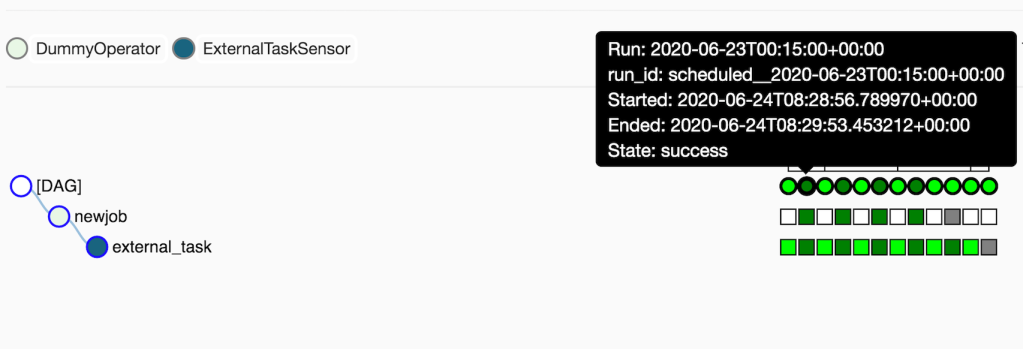
Note* Please don’t confuse with the timing. You can see the difference of 5 hours and 30 minutes due to GMT difference as Indian Standard Time (IST) is 5 hours and 30 minutes ahead of Greenwich Mean Time (GMT). So, the above picture is showing GMT time (2020-06-23T00:15:00) and the second above picture is nothing but the IST time like 6AM, 7AM, 8AM etc.

  • DependentJob DAG is having one task named DependentOperation which is nothing but a DummyOperator. 
  • DependentOperation is running every 10 minutes starting from 23rd June.
  • ExternalWorkWithExecutionDelta is having two tasks named external_task and newjob. Task external_task  is a ExternalTaskSensor which waits for the completion of it’s external task (DependentOperation) in the external DAG (DependentJob) given the fact that both the task should have the same execution date.
  • ExternalWorkWithExecutionDelta is running every 15 minutes starting from 23rd June in which external_task is having a execution_delta of 5 mins. It means that this task will be successful when it finds the the difference of 5 minutes in the dependent task execution date.
  • So now if you look at the above visuals closely, you will find that the success of the external task relies in the below data points :
    • DependentJob DAG’s execution time is as follows – 12:00 AM, 12:10 AM, 12:20 AM, 12:30 AM, 12:40 AM, 12:50 AM, 01:00 AM likewise.
    • ExternalWorkWithExecutionDelta DAG’s execution time is as follows – 12:00 AM, 12:15 AM (execution delta – 5 mins, check the dependent DAG – DependentJob execution at 12:10 AM, both the execution dates are matched hence marked as success), 12:30 AM (execution delta – 5 mins, checks DependentJob at 12:25 AM, No match hence running), 12:45 AM (execution delta – 5 mins, checks DependentJob at 12:40 AM, success), 01:00 AM (execution delta – 5 mins, checks for DependentJob at 12:55 AM, No match hence running) likewise. 
  • In addition to it, if neither execution_delta nor execution_date_fn is provided in the DAG then success of the external task/DAG is directly dependent on the success of the dependent task/DAG. Both the DAG’s execution date should be exactly same. 
                                                                           

Keeping same execution date while triggering the DAGs

One of the important thing to notice is that if you are triggering the DAGs manually, they will be running with different execution_date, which is the reason why the ExternalTaskSensor doesn’t detect the completion of the first DAG’s task. So try to run them in the same schedule.

On the same page, execution_delta and execution_date_fn arguments are provided  to synchronised the two DAGs with respect to execution date. Moreover, if schedule is provided as None in the DAG then try to trigger both the dependent DAGs with the same execution date.

Conclusion

As the title named ExternalTaskSensor suggests that it senses for the completion of a state of any task/DAG in airflow. So on that note, We will be using ExternalTaskSensor to set dependencies between our DAGs to build the complicated DATA pipelines, so that one does not run until the dependency is completed. Happy Airflowing 🙂

Android · C# · Design · Design Patterns · General · Java · PHP · Python

Design patterns Construct

Statement : While working on the projects/problems, we end up solving it with any of the optimised approach and somehow we would have applied one of the known pattern in its design directly or indirectly. So, here I am gonna take care of understanding the few of the important and frequently used design patterns irrespective of any language.

Types of Design Patterns

Mainly, we have 3 types of patterns which are categorised as follows –

  1. Creational : Take cares of creating the objects in different ways.
  2. Structural : Takes care in organising structure (relationship) among classes and objects.
  3. Behavioral : Takes care of common communications among objects.
  • Factory Pattern
  • Abstract Factory Pattern
  • Singleton Pattern
  • Decorator Pattern
  • Proxy Pattern
  • Observer Pattern

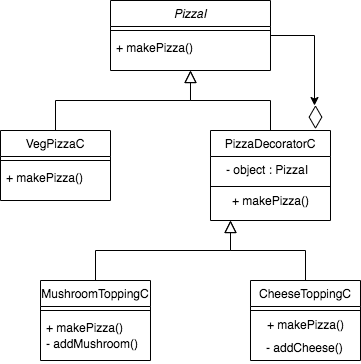
Note* In the diagrams, suffix I stands for interface and C for class.

I haven’t covered all the design patterns in this post. I’ll try to cover few more in my upcoming post if required. I hope, you would have understood the geist of above commonly used patterns in daily life. Keep exploring and sharing 🙂

Docker · General · MAC · Windows

Docker PlaySchool

Statement : Docker is a tool which enables us to create, build, deploy and publish the containers in the Micro-Service architecture world.

While working on the projects, most of us would have come across this term called Docker. In this play-school, I am gonna cover commonly used docker commands to fulfil our day to day needs irrespective of any project language preference like Java, JS, Pyhon etc

To start with, runt the below command to get the feel of what docker does. 
$ docker run hello-world
In case of any help required regarding any docker command.
$ docker action_name --help
To list all the running container.
$ docker ps
To list all the running and stopped container.
$ docker ps -a
To Get the logs of any docker container.
$ docker logs container_id
To Get the logs of any docker container in particular time-span.
$ docker logs --since 5s container_id
TO list all the available images on your machine.
$ docker image ls
To Get the detailed info about any docker container.
$ docker inspect container_id
To stop any running docker container before deletion.
$ docker stop container_id
To delete any docker container.
$ docker rm container_id
To run any docker container with the specifies.
$ docker run container_name command

To run the container in background with out interruption.
$ docker run -d container_name command

Note* To your knowledge, it does all the magic. If container_name doesn't exist on your machine then it pulls the image(container_name) from registry.
To expose the port while running any server inside docker container.
$ docker run -p Your_Machine_Port:Container_Port container_name
To expose the volume to persist the data of any docker container.
$ docker run -v /your_machine/folder:/docker/container/folder -d container_name

Dockerfile : A Dockerfile is a text document which contains all the instructions a user could call on the command line to create an image. Below is the sample Dockerfile which will have all commonly used instructions –

# FROM Instruction is the first step used to pull the base image
FROM alpine:latest

# Use RUN Instruction to execute any commands like getting all the dependencies etc
RUN apt-get update

# Use ENV/ARG Instruction to set any variable inside docker container
ENV/ARG ENV_NAME = ENV_VALUE

# Use CMD Instruction to run the command inside container
CMD ["echo", "Use this Docker PlaySchool link to build your docker competency"]

# Use WORKDIR Instruction equivalent to cd /dir 
WORKDIR /dir

# Use COPY/ADD Instruction equivalent to cp -rf machine/dir /container/dir
COPY/ADD machine/dir /container/dir

# Use EXPOSE Instruction to run the service on any port.
EXPOSE 8123

# Use ENTRYPOINT Instruction to run the service. java -jar /container/dir/app.jar
ENTRYPOINT ["java","-jar","app.jar"]
To Build the above docker image.
$ docker build -t container_name .
To run the above image.
$ docker run --rm container_name
To tag the image with some unique name before pushing into registry.
$ docker tag imae_name tag_name
To login into the docker.
$ docker login dokcer_server (write the name of the server from where you are going to push/pull the image)
To push the image into the registry.
$ docker push tag_name
To keep the container running always even if we stop the container
$ docker run --rm -it -d -p 8085:8080 --restart always container_name

To keep the container running always even unless stopped explicitly.
$ docker --rm -it -d -p 8085:8080 --restart unless-stopped  container_name
To get the resource usages of all the containers
$ docker stats
To delete all the container, volumes and images.
$ docker container prune -f
$ docker volume prune -f
$ docker image prune -f
$ docker image prune --all

I Hope I have covered almost everything required to build the docker containers and in turn it will help anyone to dockerize the application easily. Cheers 🙂

GIT · Linux · MAC

Sync/Update a forked GIT Repo

Statement : While working on a project, we need to fork a GIT repo for the local development and there we make some changes in our local branch. Once the changes are done, we raise a PR against upstream repo. Most of the times, out local forked repo goes out of sync, so keep the repo updated we need some mechanism to do the same.

Solution :

  • First, we need to define the upstream repo.
git remote add upstream https://github.com/repo.git
  • Now, fetch the upstream repo.
git fetch upstream
  • Then, check out your forked master branch.
git checkout master
  • Merge or rebase your local master branch with the upstream’s master.
git merge upstream/master
            OR
git rebase upstream/master
  • Finally, push your changes into your master branch.
git push origin master --force

Hope it helps you to sync/update your forked repo with your upstream master. 🙂

Airflow · Docker · MAC

Apache Airflow Upgrade from 1.10.2 to 1.10.5

Statement

In my previous post, I had mentioned how to upgrade your system with airflow from 1.9 to 1.10. With the increasing popularity and maturity of apache-airflow, it releases it’s version very frequently. So as we are moving ahead, later than sooner we realise the need of upgrading apache airflow. Last time we did the upgrade from 1.9 to 1.10.2 and now it’s the time to upgrade from 1.10.2 to 1.10.5.

Recommendation

As we all know, Currently Orchestration Engines uses python 2.7 and python 2.x is going to end of life soon. So to perform airflow upgrade, we need to make the system compatible with python 3.x as well as apache-airflow’s version onwards 1.10.3 supports python 3x fully.

Change in Airflow Upgrade Process

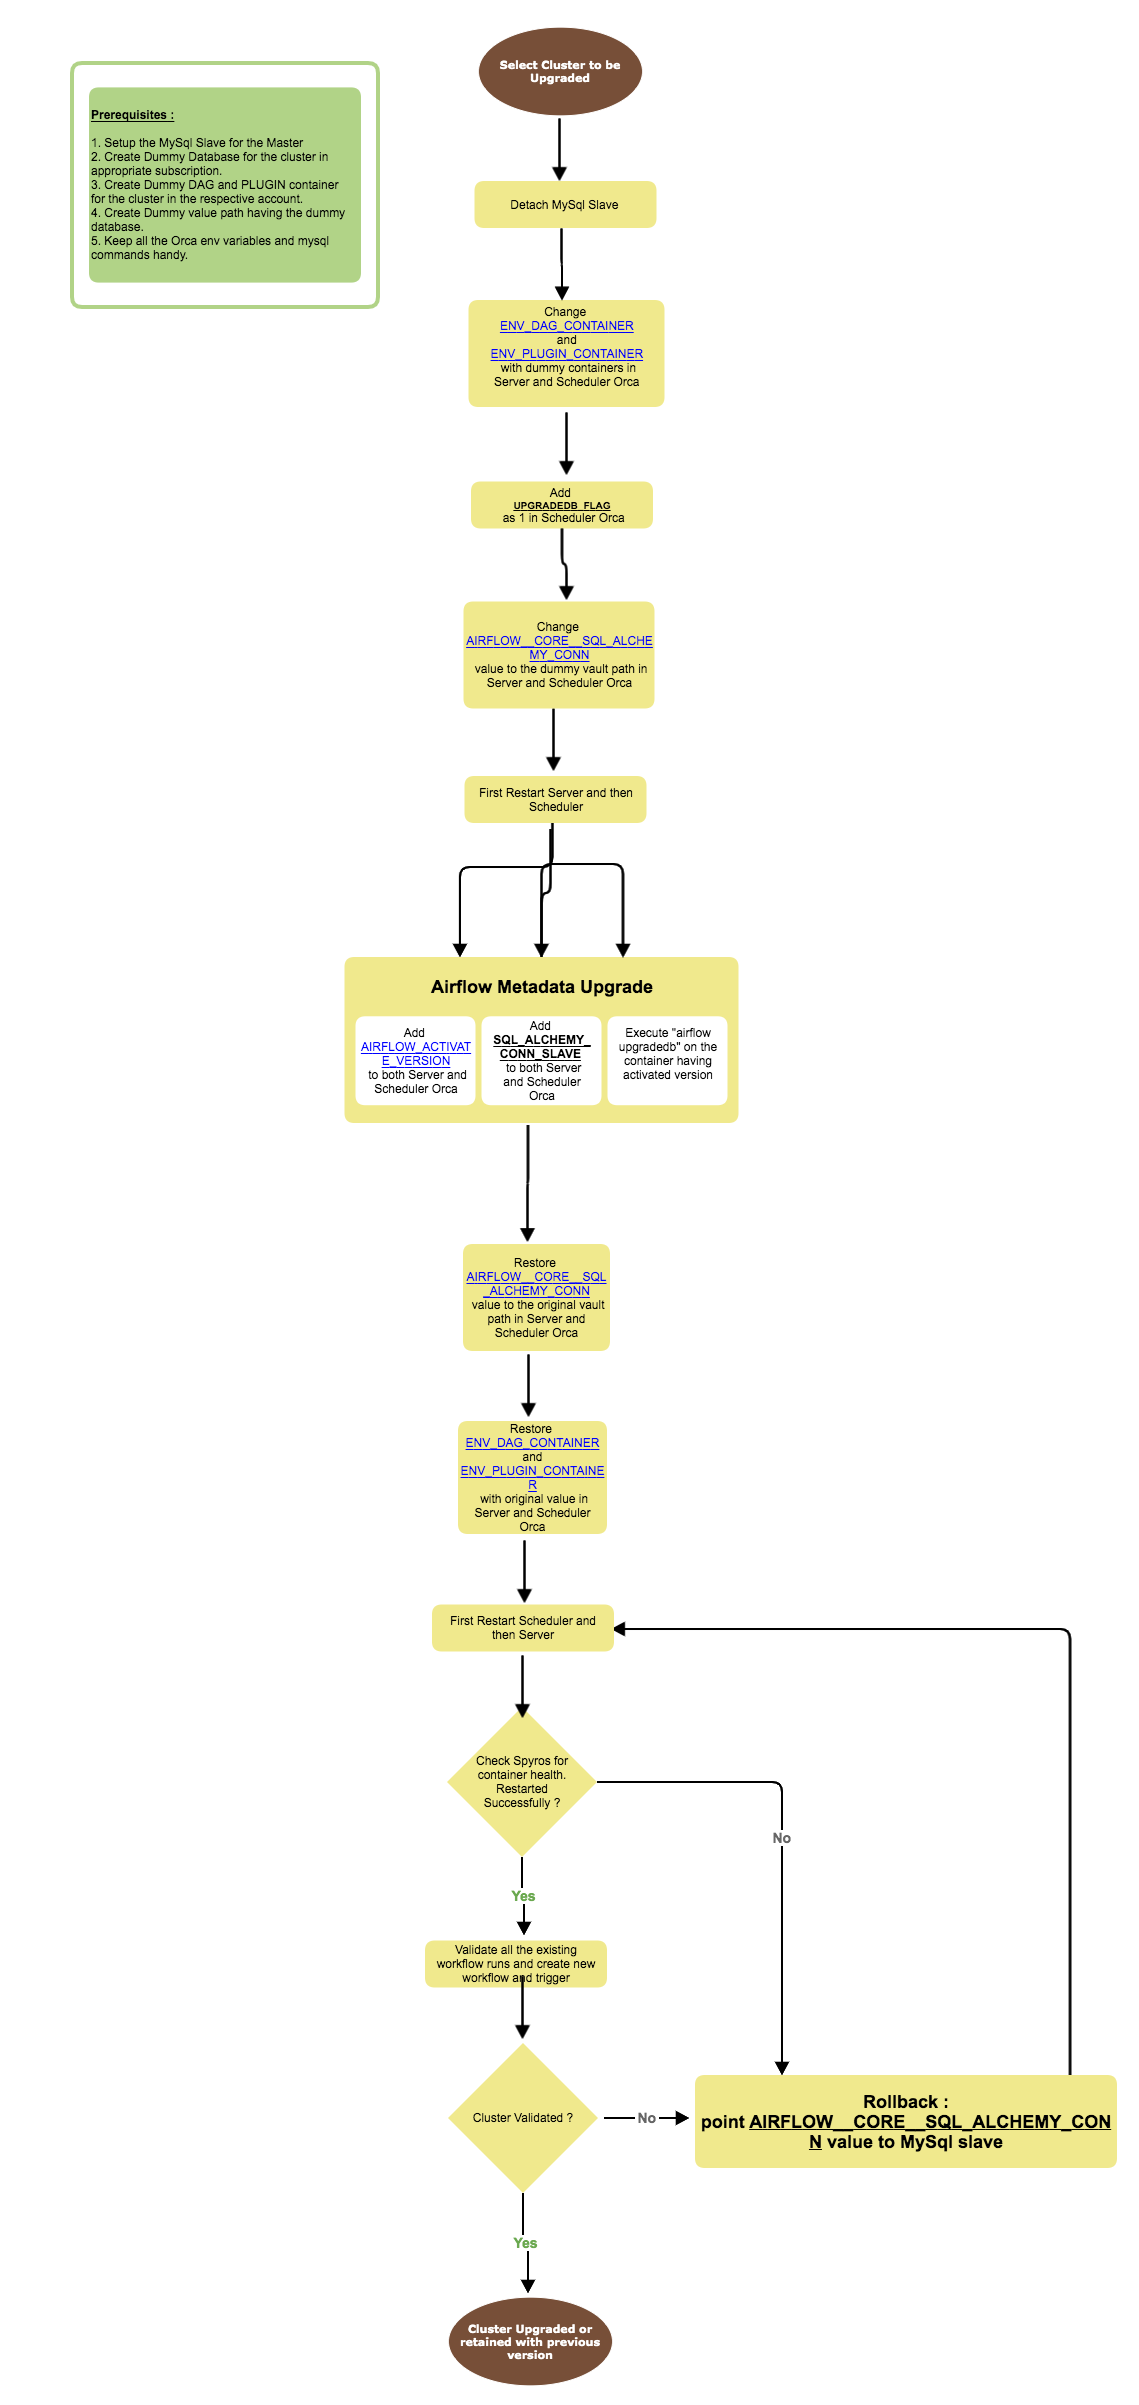
Right now, airflow metadata is created through orchestration Server. So last time, we did the airflow upgrade (1.9 to 1.10) from Orchestration Server only and there we found few issues. The major issue was timeout from Orchestration server while upgrading the metadata and in turn health check fails. So this time, we thought of doing it through Orchestration Scheduler because this is the http application and here we can by pass the health check.

Airflow Upgrade Flow-Chart

Airflow Upgrade Flow Chart

Note* Here Orca indicates the docker container on which server and scheduler is running.

Results 

  1. I was able to upgrade from 1.10.2 to 1.10.5  on my local MAC machine keeping our Service in mind.
  2. I was able to run the existing compute DAG and plugins successfully.
Airflow · Mysql · Python · Uncategorized

Apache Airflow 1.9 to 1.10 Upgrade

Upgrade or Downgrade Apache Airflow from 1.9 to 1.10 and vice-versa 

  • Check the current version using airflow version command.
  • Identify the new airflow version you want to run. 
  • Kill all the airflow containers (server, scheduler, workers etc).
  • Take the backup of all your Dags and Plugins with the current airflow.cfg file. 
  • Take the backup of your Airflow Metada. In case of Mysql use the below commend –

       mysqldump –host=MYSQL_HOST_NAME –user=MYSQL_USER_NAME –password=MYSQL_PASSWORD MYSQL_SCHEMA > airflow_metastore_mysql_backup.sql

Example – mysqldump –host=localhost –user=tanuj –password=tanuj airflow_db > airflow_meta_backup.sql

  • Upgradation from version 1.9 t0 1.10 requires setting SLUGIFY_USES_TEXT_UNIDECODE=yes or AIRFLOW_GPL_UNIDECODE=yes in your working environment.
  • Install the new version using pip install apache-airflow[celery]=={new_version} command.
  • Execute the command airflow initdb to regenerate the new metadata tables for the new version. Delete the newly generated airflow.cfg and copy the one which you backed up previously.
  • Update the old airflow.cfg with the compatible parameters of the new version. Like for celery 1.10 setup I have mentioned above.
  • Run airflow upgradedb to upgrade the schema.
  • Run show processlist; command on mysql to see the changes happening at mysql level.
  • Restart all the airflow containers (server, scheduler, workers etc) and test everything is working fine.
  • In case we find any issue regarding booting up the service or tasks are not running as usual then we need to rollback with the previous airflow version.

Issues faced while Upgrading/Downgrading Apache Airflow from 1.9 to 1.10 and vice-versa 

Issue Faced

Reason

Solution

pessimistic_connection_handling

ImportError

pessimistic_connection_handling()

is a part of Airflow 1.9 source code and it’s removed from Airflow 1.10.

Either I’ll have to move this function code to our plugin asit is or I’ll some other way to

fulfill the health-detailed api.

Sensor hierarchy ErrorImportError: No module named snakebite.client Previously(1.9 setup) all the 1st class airflow sensors were there inside

airflow.operators.sensors package. Now (1.10 setup), all the 1st class airflow operators and sensors are moved to airflow.operators and airflow.sensors package respectively for consistency purpose.

Instead of using airflow.operators.sensors package, it is changed as

airflow.sensors.
In addition to it, rename airflow.contrib.sensors.

hdfs_sensors to airflow.contrib.sensors.

hdfs_sensor for consistency purpose in case we use it in

future.

TIMEZONE
ImportError:
When I apply set global explicit_defaults_for_timestamp=1;at the time of running instances of airflow 1.10 server and scheduler. it gives the same error on both server and scheduler. In turn, Worker failed to boot. Apply this mysql setting after killing all the airflow containers.
Command – [SET GLOBAL explicit_defaults_for_timestamp=1;]
ResolutionError:No such revision or branch ‘9635ae0956e7’ When I downgrade the airflow metadata and run airflow initdb. It gives the same error. In case of downgrade, restore the backed up metadata and then execute the airflow initdb command.
IntegrityError:

(1062, “Duplicate entry “)

When I downgrade the airflow metadata and run airflow initdb. It gives the same error. In case of downgrade, restore the backed up metadata and then execute the airflow initdb command.
Broken DAG:  cannot import name ‘TIMEZONE’ In case, I upgrade the airflow version while running the old version. I get this error on Airflow UI and server as well. First kill all the container then install the new version.
ERROR – [0 / 0] some workers seem to have died When I run airflow upgradedb while running the old version. I get this error server and scheduler as well. First kill all the container then execute the upgrade command

Rollback Strategy for Airflow 

  • Kill all the airflow containers (server, scheduler, workers etc).
  • Restore MySql database which was taken as a backup at the time of upgrade. Below command –

            $ mysql –host=MYSQL_HOST_NAME –user=MYSQL_USER_NAME –password=MYSQL_PASSWORD  MYSQL_SCHEMA < airflow_metastore_mysql_backup.sqlU

  • Copy patse the backed up airflow.cfg in AIRFLOW_HOME.
  • Reinstall the old airflow version using  pip install airflow[celery]=={OLD_AIRFLOW_VERSION} –upgrade
  • Finally, restart all the airflow containers (server, scheduler, workers etc) and test everything is working fine.

Results 

  1. I have performed this airflow 1.10 installation and upgrade/downgrade (1.9 to 1.10 and vice-versa) on my local MAC machine keeping our Service in mind.
  2. I was able to run the existing compute DAG and plugins successfully.
Airflow · Mysql · Uncategorized

Airflow Upgradability

Problem Statement : While working with Apache Airflow, we need to navigate between the various versions (1.8, 1.9, 1.10 etc) of it. For that we need to define the process to upgrade the Apache Airflow from one version to another version.

Upgrade Types 

As we are having multiple clusters in terms of multiple airflow servers and schedulers. So we have mainly 2 kinds of upgrade based on the client’s requirements.

Full Upgrade

In this we need to upgrade all the clusters defined in the CI-CD pipeline for the deployment

Upgrade Approaches

  1. By taking down-time
    1. First kill the airflow containers like server, scheduler and workers.
      1. One way is to wait for all the running tasks to either complete as success or fail to kill the container and then disable all the tasks. But it will introduce the longer down-time based on the behaviour of task completion.  In this way we will have to maintain a map of user disabled tasks and script disabled tasks.
      2. Other way is to directly kill the containers. As soon as the new container comes up, all the running tasks should be completed as success or fail based on it’s nature.
    2. Take the backup of airflow metadata.
    3. Make the necessary setting for the new airflow version as a part of docker build args .
    4. Install the new airflow version on all the containers.
    5. In case, installation fails, restore the DB to it’s previous backed up state.
    6. Execute the airflow upgradedb command to make the necessary changes in airflow metadata required for airflow server and scheduler both.
    7. Again, if installation fails, restore the DB to it’s previous backed up state.
    8. Start all the containers to boot the service.
  2. With out taking down-time
    1. Define the NEW_VERSION_NAME as run-time build args in the service yml file and this will be applicable for all the clusters defined as a part of  pipeline
    2. Re-onboard the service again with this NEW_VERSION_NAME.
    3. Redirect all the current cluster’s (running containers) traffic to the dummy DB to avoid inconsistency in the current Airflow metadata.
    4. Take the backup of airflow metadata.
    5. Build the docker images with this NEW_VERSION_NAME which will be applicable for all the clusters.
    6. Make the necessary setting for the new airflow version as a part of docker build args.
    7. Execute the airflow upgradedb command to make the necessary changes in airflow metadata required for airflow server and scheduler both.
    8. If installation fails, restore the DB to it’s previous backed up state.
    9. Start all the containers to boot the service which will point to the original metadata.

Partial Upgrade

In this, we may need to upgrade the specific cluster based on the client’s requirement.

  • By installing the required binary at deploy step

So there are following steps which are needed to perform as a part of deployment –

  1. Define a Environment variable like NEW_VERSION_NAME = 1.10.1 in the required cluster.
  2. Install the airflow new version by comparing the airflow current version and NEW_VERSION_NAME through the run file which is executed as a part of execution of the desired docker image on the given cluster(container) at deploy step. In addition to it, we need to maintain additional requirement_NEW_VERSION_NAME.txt to download the additional dependencies as a part of NEW_VERSION_NAME and these will also take care by the run file.
  3.  In this case, we need to invoke the airflow upgradedb to make the appropriate schema changes for Mysql required for apache airflow NEW_VERSION_NAME but run file always executes the initdb and upgradedb is the part of that command.
  4. In case of any failure, we need to take the backup of existing scheme so that we can rollback the same and that will cause some downtime in the service.
  5. Now, container is started and make sure there is no inconsistency in the system.
  • By creating multiple virtual environments

     In this, we need to perform the following steps as a part of deployment –

  1. By default, one virtual environment is already created inside the container and that environment is used to run the default airflow binary 1.9 on all the clusters.
  2. To suffice the use case of partial upgrade, we need to create more virtual environments based on the binary needed on the clusters.
  3. Create the virtual environments and install the different versions of apache-airflow in those environments at build step.
  4. Now, based on the defined NEW_VERSION_NAME as a part of env variable, we need to switch the virtual environment on that specific cluster.
  5. The problem with this approach is to create multiple environments and install the desired binary in that. As soon as number of binaries are increased, this becomes bottleneck and it will be memory intensive.Note* : To avoid initdb execution everytime when run script is called at the time of deploy step, I have controlled it through the Env variable called INITDB_FLAG. Once any new cluster is setup, we set the value of this variable otherwise this is not set in Env variable.

Hope this will help you to upgrade your airflow clusters.

Airflow · Docker · Linux · MAC · Python · Windows

Running Cron job and access Env Variable inside Docker Container

Statement : The sole purpose of this post is to learn how to run a cron job which I have demonstrated in my previous post and access the environment variable inside the Docker container.

Prerequisites – Please follow the previous post steps to install and the whole process of building and running the cron job inside the Docker container.

Using environment variables :  Here the goal is to read the environment variable inside the script file. If we don’t inject the env variable using the below approach, we won’t be able to access the env variable. With out injecting the env variable, if we do echo $ENV_DAG_NAME inside the script, then it will give us the output as empty String. If we do the echo on the command prompt, then it will give us the right output.

Steps : Please follow the below steps to implement the whole task one by one –

  • Dockerfile includes the base image and contains the dependencies required to build and run the image –
FROM ubuntu:16.04 
RUN apt-get update && apt install -y build-essential libmysqlclient-dev python-dev libapr1-dev libsvn-dev wget libcurl4-nss-dev libsasl2-dev libsasl2-modules zlib1g-dev curl cron zip && DEBIAN_FRONTEND=noninteractive apt-get install -yq --no-install-recommends rsync && apt-get clean autoclean && apt-get autoremove -y && rm -rf /var/lib/apt/lists/*
// Either Hardcode the environment variable here or pass these through docker run command using -e flag (ex. "-e ENV_DAG_CONTAINER=test")
ENV ENV_DAG_CONTAINER=test
COPY crontab /tmp/crontab
COPY run-crond.sh /run-crond.sh
COPY script.sh /script.sh
DD dag_script.sh /dag_script.sh
RUN chmod +x /dag_script.sh && chmod +x /script.sh && touch /var/log/cron.log
CMD ["/run-crond.sh"]
  • *Important Step : The below line shows how to grep environment variable and use them in the script. In this, first I grep the env variable (ENV_DAG_CONTAINER) and then moved this variable into the temp file. Finally added this at the top of the script so that we can use it.
$ env | egrep '^ENV_DAG' | cat - /dag_script.sh > temp && mv temp /dag_script.sh
  • Add env variable to the docker run command using the below command or set them inside the Docker file (shown in the Dockerfile) if you don’t need to change them at run time.
$ docker run -it -e ENV_DAG_CONTAINER=tanuj docker-cron-example
  • Finally, the entry point script is like below (run-crond.sh) –
#!/bin/sh
crontab /tmp/crontab
#The below line shows how to grep environment variable aur use them in the script. In this, first I have greped the env variable (ENV_DAG_CONTAINER) and then moved this variable into the temp file. Finally added this at the top of the script so that we can use it.
env | egrep '^ENV_DAG' | cat - /dag_script.sh > temp && mv temp /dag_script.sh
#To start the cron service inside the container. If below is not working then use "cron/crond -L /var/log/cron.log"
service cron start
  • crontab contains the list of cron jobs to be scheduled for the specific time. In the below crontab, I have shown how to run any script with in the interval of seconds using cron job (See the 5th line to echo the message in the internal of 5 seconds once the cron demean has been triggered). **Basically cron job has the granularity of 1 minute to run any job. So initially it takes minimum one minute to boot the job when we don’t initialise any time ( like this * * * * *) after that it executes based on the script (I ran the script in the interval of 5 seconds).
# In this crontab file, multiple lines are added for the testing purose. Please use them based on your need.
* * * * * /script.sh
* * * * * /dag_script.sh >> /var/log/cron/cron.log 2>&1
#* * * * * ( sleep 5 && echo "Hello world" >> /var/log/cron/cron.log 2>&1 )
* * * * * while true; do echo "Hello world" >> /var/log/cron/cron.log 2>&1 & sleep 1; done
#* * * * * sleep 10; echo "Hello world" >> /var/log/cron/cron.log 2>&1
#*/1 * * * * rclone sync remote:test /tmp/azure/local && rsync -avc /tmp/azure/local /tmp/azure/dag
#* * * * * while true; do rclone sync -v remote:test /tmp/azure/local/dag && rsync -avc /tmp/azure/local/dag/* /usr/tanuj/dag & sleep 5; done
#* * * * * while true; do rclone sync -v remote:test /tmp/azure/local/plugin && rsync -avc /tmp/azure/local/plugin/* /usr/tanuj/plugin & sleep 5; done
# Don't remove the empty line at the end of this file. It is required to run the cron job
  • Write the script files to be executed with cron job. Below is the example of dag_script.sh file –
// This below line will be appeneded through the run-scrond.sh file once the container is started. I have used it here for the testing purpose. // This below line will be appeneded through the run-scrond.sh file once the container is started. I have used it here for the testing purpose. 
ENV_DAG_CONTAINER=test
echo "$(date): executed script" >> /var/log/cron.log 2>&1
if [ -n "$ENV_DAG_CONTAINER" ]
then    
     echo "rclone process is started"  
     while true; do  
            rclone sync -v remote:$ENV_DAG_CONTAINER /tmp/azure/local/dags && rsync -avc /tmp/azure/local/dags/* /usr/local/airflow/dags & sleep 5;
     done     
     echo "rclone and rsync process is ended"
fi

So, this is the way to run the cron job inside the docker container and learn how to access the env variable inside the same. Hope you enjoy it and find the full source code of the above implementation from the git. Happy Reading 🙂

Linux · MAC · Python

Working with Jupyter Notebook, Conda Environment, Python and IPython

Statement : The whole purpose of this post is to learn how to work with Jupyter Notebook which helps Data Science Engineers to create documents having code, images, links and equations etc inside it. Jupyter notebook is meant to explore the primary languages like  Julia, Python, and R etc.

Prerequisites : Ensure python (either Python 3.3 or greater or Python 2.7) is installed on your machine.

Installation :

  1. Using Anaconda Python Distribution : Download Anaconda from the respective link depending on your machine.
  2. Using pip : Make sure pip in installed on your machine and then use the below commands –
# On Windows
python -m pip install -U pip setuptools
# On OS X or Linux
pip install -U pip setuptools

Once you have pip, you can just run –

# Python2
pip install jupyter
# Python 3
pip3 install jupyter
  • Working with Conda : Sometimes, you just need to toggle from python 2 to python3 while working with python supported libraries. To do so, we just create the virtual environment and use the same. Use the below command to create the same –
# Python 2.7
conda create -n python27 python=2.7 ipykernel/anaconda
# Python 3.5
conda create -npython35 python=3.5 ipykernel/anaconda
  • By default,  all the  environments are stored in the  subfolder of your anaconda installation: ~Anaconda_installation_folder~/envs/
To list all the conda environments use the below command - 
# conda info --envs
conda environments:
# gl-env /Users/tanuj/anaconda3/envs/gl-env
opencvtest /Users/tanuj/anaconda3/envs/opencvtest
python35 /Users/tanuj/anaconda3/envs/python35
python27 /Users/tanuj/anaconda3/envs/python27
root /Users/tanuj/anaconda3/envs/root

Once you activate the desired environment, you will be inside the same. Run the below command to activate and deactivate  –

source activate python27/python35

source deactivate

  • Running Jupyter Notebook : Execute the following command to run the same –
tanuj$ source activate gl-env
(gl-env) tanuj$ ipython/jupyter notebook

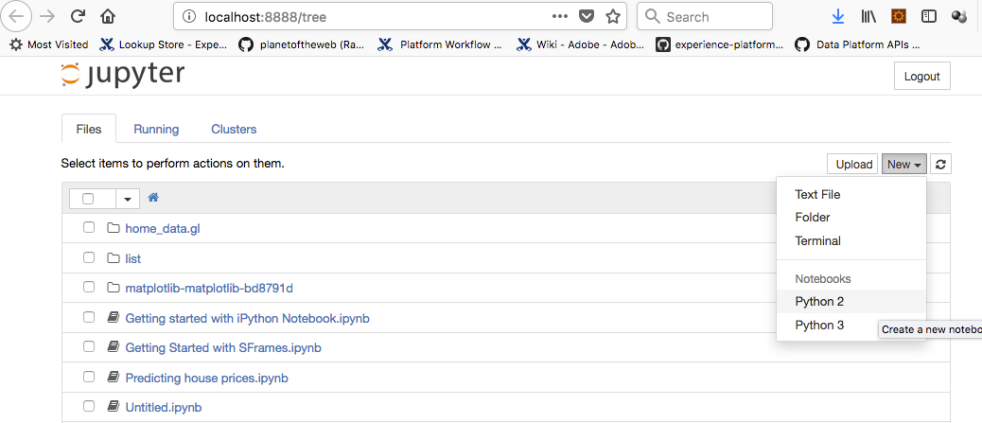
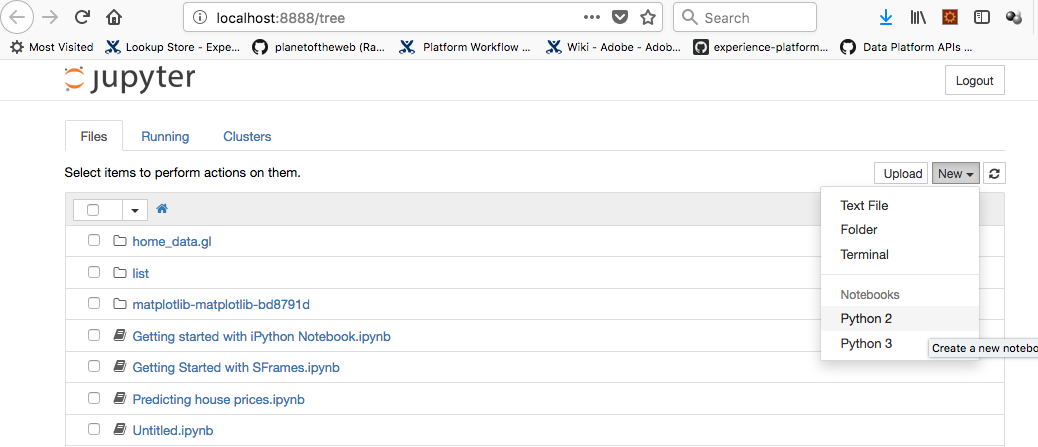
After running the notebook, you will observe the different kernels running through notebook as below –

Screen Shot 2018-03-08 at 3.02.02 PM.png

You can switch to different kernels at any point of time depending on the requirements you have. Hope this helps!! Enjoy Python and Data science using Notebook 🙂

Airflow · Docker · General · Linux · MAC · Windows

Run a cron job (Sync remote to local repo) using Docker

Statement : The sole purpose of this post is to first learn how to run a simple cron job using Docker and then implement a complex cron job like syncing of remote azure blob repository with the local directory which I have demonstrated in this post.

Prerequisites : Install Docker and learn how to use rclone through the respective links.

Steps to create the cron job and related files :

  •  First we need to create a cron job by creating the below crontab file –
*/1 * * * * echo "First Cron Job" >> /var/log/cron/cron.log 0>&1
*/1 * * * * rclone sync remote:test /tmp/azure/local
#*/2 * * * * mv /var/log/cron/cron.log /tmp/azure/local
*/2 * * * * rsync -avc /tmp/azure/local /tmp/azure/dag
# Don't remove the empty line at the end of this file. It is required to run the cron job

In the interval of 1 minute, you will see “First Cron Job” as an output on the terminal and same would be saved in the given path log file (/var/log/cron/cron.lo).

  • To dockerize the image, make the file named Dockerfile as below –
FROM ubuntu:16.06
RUN apt-get update && apt install -y build-essential libmysqlclient-dev python-dev libapr1-dev libsvn-dev wget libcurl4-nss-dev libsasl2-dev libsasl2-modules zlib1g-dev curl 

RUN apt-get install --no-install-recommends cron 

RUN apt-get update && DEBIAN_FRONTEND=noninteractive apt-get install -yq --no-install-recommends rsync && apt-get clean autoclean && apt-get autoremove -y && rm -rf /var/lib/apt/lists/*

RUN apt-get install zip -y

# Add crontab file in the cron directory
COPY crontab /tmp/crontab
 
# Give execution rights on the cron job
RUN chmod 755 /tmp/crontab

COPY run-crond.sh /run-crond.sh

RUN chmod -v +x /run-crond.sh
 
# Create the log file to be able to run tail
RUN touch /var/log/cron.log
 
# Run the command on container startup
CMD cron && tail -f /var/log/cron.log

# Steps to install rclone on Docker 
RUN mkdir -p /tmp/azure/local
RUN mkdir -p /tmp/azure/dag
RUN curl -O https://downloads.rclone.org/rclone-current-linux-amd64.zip
RUN unzip rclone-current-linux-amd64.zip
WORKDIR rclone-v1.39-linux-amd64
RUN cp rclone /usr/bin/
RUN chown root:root /usr/bin/rclone
RUN chmod 755 /usr/bin/rclone

# Configuration related to rclone default config file containing azure blob account details
RUN mkdir -p /root/.config/rclone 
RUN chmod 755 /root/.config/rclone
COPY rclone.conf /root/.config/rclone/

# Run cron job
CMD ["/run-crond.sh"]

  • Create a run-cron.sh file through which cron job is scheduled and path of log file is declared –
#!/bin/sh
crontab /tmp/crontab
cron -L /var/log/cron/cron.log "$@" && tail -f /var/log/cron/cron.log
  • create a rclone.conf file which will be containing the required details of azure blob account to sync the content from remote repo to local.
[remote]
type = azureblob
account = Name of your created azure blog account 
key = Put your key of the blob account
endpoint =

Run the cron Job :

  • Firstly, you need to build the docker file using the below command –
$ docker build -t cron-job .
  • Now, you need to run the docker image using the below command –
$ docker run -it --name cron-job cron-job

In the interval of 1 minute, you will see the below output on the terminal and same would ve saved in the given path log file.

First Cron Job
First Cron Job
.
.
In addition to it, It will sync the remote azure blog directory with the local directory path in every 2 minutes.

Now you can create your own cron job based on the requirement. Source code is available on github. Enjoy and Happy Cron Docker Learning 🙂

Airflow · General · MAC

Working with rclone to sync the remote machine files (AWS, Azure etc) with local machine

Statement : The sole purpose of this post is to learn how to keep in sync the remote data stored in AWS, Azure blob storage etc with the local file system.

Installation : Install rclone from the link based on your machine (Windows, Linux and MAC etc). I have worked on MAC so downloaded the respected file.

Steps : In my case, I have stored my files in Azure blob storage and AWS S3 bucket as well. So given below are the steps by which we can make the data in sync with the local directory.

  • Go to downloaded folder and execute the following command to configure rclone –

tangupta-mbp:rclone-v1.39-osx-amd64 tangupta$ ./rclone config

  • Initially there will be no remote found then you need to create the new remote.
No remotes found - make a new one
n) New remote
s) Set configuration password
q) Quit config
n/s/q> n
name> remote
  • Now, It’ll ask for the type of storage like aws, azure, box, google drive etc to configure. I have chosen to use azure blog storage.
Storage> azureblob
  • Now it’ll ask for the details of azure blob storage like account name, key, end point (Keep it blank) etc.
Storage Account Name
account> your_created_account_name_on azure
Storage Account Key
key> generated_key_to_be_copied_through_azure_portal
Endpoint for the service - leave blank normally.
endpoint> 
--------------------
y) Yes this is OK
e) Edit this remote
d) Delete this remote
y/e/d> y
  • To list all the contained created on Azure portal under this account name –
tangupta$./rclone lsd remote:

             -1 2018-02-05 12:37:03        -1 test

  • To list all the files uploaded or created under the container (test in my case) –
tangupta$./rclone ls remote:test

    90589 Gaurav.pdf

    48128 Resume shashank.doc

    26301 Resume_Shobhit.docx

    29366 Siddharth..docx

  • To Copy all the files uploaded or created under the container to the local machine or vice versa  –

tangupta$./rclone copy /Users/tanuj/airflow/dag remote:test

  • Most importantly, now use the below command to sync the local file system to the remote container, deleting any excess files in the container.

tangupta$./rclone sync /Users/tanuj/airflow/dag remote:test

The Good thing about rclone sync is that it’ll download the updated content only. In the way, you can play with AWS storage to sync the file. Apart from all these commands, rclone has given us the facility to copy, move, delete commands to do the respective job in the appropriate way.

Now, one can use the rsync command to copy/sync/backup the contents between different directories locally and remotely as well. It is widely used command to transfer the partial transfer (difference of data in files) between source and destination node.

tangupta$ rsync --avc --delete /Users/tanuj/airflow/test /Users/tanuj/airflow/dags

Hope this works for you. Enjoy 🙂

Airflow · General · Linux · MAC · Python

Airflow Installation on MAC/Linux

Statement : The purpose of this post is to install Airflow on the MAC machine.

Airflow is a platform to programmatically author, schedule and monitor workflows. Use airflow to author workflows as directed acyclic graphs (DAGs) of tasks. The airflow scheduler executes your tasks on an array of workers while following the specified dependencies. (Taken from Apache Airflow Official Page)

Installation Steps :

  •  Need to setup a home for airflow directory using the below command –
mkdir ~/Airflow 
export AIRFLOW_HOME=~/Airflow
  • As airflow is written in python. So first make sure that python is installed on the machine. If not, use the below command to install the python –
cd Airflow 
brew install python python3
  •  Now install airflow using pip (package management system used to install and manage software packages written in Python).
pip install airflow

Most probably, you would be getting some installation error which is given below using the above command –

“Found existing installation: six 1.4.1

DEPRECATION: Uninstalling a distutils installed project (six) has been deprecated and will be removed in a future version. This is due to the fact that uninstalling a distutils project will only partially uninstall the project.

Uninstalling six-1.4.1:” 

  • So to avoid this, use the below command to install the airflow successfully –
pip install --ignore-installed six airflow
# To install required packages based on the need 
pip install--ignore-installed six airflow[crypto] # For connection credentials security
pip install--ignore-installed six airflow[postgres] # For PostgreSQL Database
pip install--ignore-installed six airflow[celery] # For distributed mode: celery executor
pip install--ignore-installed six airflow[rabbitmq] # For message queuing and passing between airflow server and workers
  • Even after executing the above command, you would be getting some permission errors like “error: [Errno 13] Permission denied: ‘/usr/local/bin/mako-render”. So give permission to all those folders which are getting executed in the above command –
sudo chown -R $USER /Library/Python/2.7
sudo chown -R $USER /usr/local/bin/

Airflow uses a sqlite database which will be installed in parallel and create the necessary tables to check the status of DAG (Directed Acyclic Graph – is a collection of all the tasks you want to run, organised in a way that reflects their relationships and dependencies.) and other information related to this.

  •  Now as a last step we need to initialise the sqlite database using the below command-
airflow initdb
  •  Finally, everything is done and it’s time to start the web server to play with Airflow UI using the below command –
airflow webserver -p 8080

Enjoy Airflow in your flow 🙂 Use the github link  to go through all the samples. Enjoy Coding!!

General · GIT · Java · Jersey · Linux · MAC · Spring · Windows

Host your application on the Internet

Statement : The sole purpose of this post is to learn how to host your application to the Internet so that anyone can access it across the world.

Solution :

  • Sign up for the heroku account.
  • Download heroku cli to host you application from your local terminal.
  • Login to your account by using id and password through terminal by using below command –

heroku login

  • Create a new repo on your github account.
  • Now clone your repo on your local machine using the below command –

git clone https://github.com/guptakumartanuj/Cryptocurrency-Concierge.git

  • It’s time to develop your application. Once it is done, push your whole code to your github repo by using below commands –
  1. tangupta-mbp:Cryptocurrency-Concierge tangupta$ git add .
  2. tangupta-mbp:Cryptocurrency-Concierge tangupta$ git commit -m “First commit of cryptocurrency Concierge””
  3. tangupta-mbp:Cryptocurrency-Concierge tangupta$ git push
  • Now you are ready to crate a heroku app. Use the below command for the same –
cd ~/workingDir
$ heroku create
Creating app... done, ⬢ any-random-name
https://any-random-name.herokuapp.com/ | https://git.heroku.com/any-random-name.git
  • Now commit you application to heroku using the below command –

tangupta-mbp:Cryptocurrency-Concierge tangupta$ git push heroku master

  • It’s time to access your hosted application using the above highlighted url. But most probably you won’t be able to access the same. Make sure one instance of your hosted application is running. Use the below command to do the same –

heroku ps:scale web=1

  • In case, you are getting the below error while running the above command, then you need to make one file name Procfile with no extension and add the same to git repo. Then you need to push the repo to heroku again.

Scaling dynos… !

    Couldn’t find that process type.

  • In my case, to run my spring boot application, I have added the following command in the Procfile to run the application.

          web: java $JAVA_OPTS -Dserver.port=$PORT -jar target/*.war

  • Finally your application should be up and running. In case, you are facing any issues while pushing or running your application, you can check the heroku logs which will help you to troubleshoot the issue by using below commands-

heroku logs –tail

Enjoy coding and Happy Learning 🙂 


General · Linux · MAC · Windows

Redirect local IP (web application) to Internet (Public IP)

Statement : The purpose of this post is to host your application which is running locally to internet. In the other words, we can say that there is a requirement to redirect the local IP to Internet (Public IP).

Solution :

  1.  Download ngrok on your machine.
  2.  Let’s say, my application is running locally (localhost/127.0.0.1) on the port 8080 and I want to make it visible publicly so that other users can access it. Use the below command to get the public IP.

           tangupta-mbp:Downloads tangupta$ ./ngrok http 8080

In the output of the above command, you will get the below console –

ngrok by @inconshreveable                                                                                                      

Session Status                connecting                                                                                                     Version                       2.2.8                                                                                                                      Region                        United States (us)                                                                                               Web Interface                 http://127.0.0.1:4040           

Forwarding                    http://23b81bac.ngrok.io -> localhost:8080   

Forwarding                    https://23b81bac.ngrok.io -> localhost:8080

  1. Now, you will be able to access your application using the above highlighted http or https url.

Hope it works for you and fulfils your purpose of accessing your application publicly. Enjoy Learning 🙂

PHP

How to enable debugging through Eclipse/STS

  1. First Add below lines in php.ini –

;[XDebug]

;zend_extension = “C:\xampp\php\ext\php_xdebug.dll”

;xdebug.remote_enable = 1

;xdebug.remote_autostart=1

;xdebug.remote_host=localhost

;xdebug.remote_port=9000

semicolon (;) is used to comment the line.

  1. Now go to STS –

Right Click on Box Project -> Debug As -> Debug Configurations -> PhP Web Aplication -> New

Name it as Box_Integration or whatever you want –

In the Server Tab -> Php Server Configure -> Configure

Server Tab ->

Server Name : other.local-dev.creativefeature.com (change yrs)

Base URL : http://other.local-dev.creativefeature.com:447 (change yrs)

Document Root : Browse the root directory of the php project (My path – C:\xampp\htdocs\other.local-dev.creativefeature.com)

Debugger Tab ->

Debugger : XDebug

Port : 9000

Path Mapping Tab ->

Path On Server :  C:\xampp\htdocs\other.local-dev.creativefeature.com

Path in Wrokspace : /feature-box-integration

Now Finish and come to main Server Tab .

In File : Give path of php page which you want to debug . /feature-box-integration/src/company/feature/BoxBundle/Api/feature.php

URL :   http://other.local-dev.creativefeature.com:447/  map to /

Now Enjoy debugging.

Note* – If you are stuck at the 2nd line of app.php or app_dev.php while debuging, Go to preferences of IDE (Eclipse in my case), search debug. Click on the Debug of PHP, you can see that “Break at First line” is checked by default. You need to uncheck it. Hope now the problem will be solved.

Docker · General · GIT · Java · Mysql · Spring

Dockerize Microservice (SpringBoot RESTful Application with Mysql)

Statement : With the help of Docker, one can easily create, deploy and run their applications. So in this article, we’ll learn how one can deploy their Microserives (Spring Boot Application connected with Mysql Backend) to Docker Container.

Prerequisites : Please insure that Docker, Java, Mysql and mvn is installed on your machine. Now, please follow the below steps to dockerize your microservice –

  • Build your code : Maven is used as the build automation tool, so we need to build our code through the below command so that we can get the complete jar file having the actual application code with all the required dependencies.
mvn clean install
  • Create Dockerfile : Go to the root of the application where pom.xml is contained. Below is the content of my Dockerfile –
#Fetch the base Jav8 image
FROM java:8
#Expose the local application port
EXPOSE 8080
#Place the jar file to the docker location
ADD /target/microservicedemo-1.0-SNAPSHOT.jar microservicedemo-1.0-SNAPSHOT.jar
#Place the config file as a part of application
ADD src/main/resources/application.properties application.properties
#execute the application
ENTRYPOINT ["java","-jar","microservicedemo-1.0-SNAPSHOT.jar"]
  •  Go to Spring Boot applicaion.properties where you have mentioned the backend url in terms of mysql database.
spring.datasource.url = jdbc:mysql://localhost:3306/microservice
// Change the above url to the below one
spring.datasource.url = jdbc:mysql://mymicroservicesqldbdb:3306/microservice
  • When we run any application on Docker Container, we need to tell the existence of mysql backend if any with the help of docker networking. So, instead of running the mysql instance locally, we need to run one more docker container for mysql. For that, we need to create one network so that both the application and mysql docker container can talk to each other.
docker network create account-mysql
  • Spring Boot application has the requirement of connecting with Mysql instance, so firstly I need to run mysql container and I can pull that mysql image from docker hub directly.
docker container run --name mymicroservicesqldbdb --network account-mysql -e MYSQL_USER=demo -e MYSQL_PASSWORD=demo -e MYSQL_DATABASE=microservice -e MYSQL_ROOT_PASSWORD=root -d mysql:8
  • Build Docker Image : Now, it is the time to build the actual docker image.
docker build -f Dockerfile -t microservice .
  • Run the Docker Image :
docker run --network account-mysql -p 8000:8080 -t microservice

Option -p publishes or maps host system port 8000 (where you need to host the application like local machine) to container port 8080 (where your actual application code resides).

  • To find the details of your running container
$ docker ps
CONTAINER ID        IMAGE               COMMAND                  CREATED              STATUS              PORTS                    NAMES
fb15604af25b        microservice        "java -jar microserv…"   About a minute ago   Up About a minute   0.0.0.0:8000->8080/tcp   serene_chaplygin
d1609d184de5        mysql:8             "docker-entrypoint.s…"   55 minutes ago       Up 55 minutes       3306/tcp, 33060/tcp      mymicroservicesqldbdb

You can find the complete code in my github repository. Now you can test your REST APIs through the url http://localhost:8000 using any of the REST client . Hope it helps you to deckerize your microservice easily. 🙂

General · Interviews · Java

Coding Interview Cheat-Sheet/ FAAAMNG Preparation/ Smart Code Thinking/ Last Night Coding Interview Guide

Statement : Getting a job offer from FAAAMNG (Facebook, Adobe, Amazon, Apple, Microsoft, Netflix & Google) companies is like a dream comes true specially for IT guys working or want to work in the field of software development. Most of these top notch companies conduct 3 to 4 rounds of interviews based on the experience level of candidates and in that checking the problem solving skills & creative thinking in terms of coding round is must. Trust me, it is not the easy process to crack specially for those who are either not from CS/IT background or not having a tag of 1st tier colleges in India. Moreover, I have designed this article for all these kind of candidates who aim to get into not only FAAAMNG companies but few product based companies as well. In this, I have tried to cover few of the tips and tricks to crack the coding interviews. This article will not only guide you to think in terms of different approaches of solving the coding problems but give you the gist of existing set of commonly used Data Structures and Algorithms. Based on the interview process, I have already talked about the system design concepts in my previous article which are really very useful to start working with new projects/products in your college/company.

DS and Alogs Approaches covered as a part of this video :

• Arrays/Strings

o Sorting Algorithms (Insertion, Merge and Counting etc ) 
o Searching Algorithms (Linear, Binary Search and Extended Binary Search through 2 Pointers or Fast & Slow Pointers Approach) 
o Greedy Algorithms 
o Backtracking (Recursion) 
o Dynamic Programming Paradigm (Top-Down/Memoization & Buttom-Up/Tabulation) 
o Maths and Stats 
o Hashing (Array, Set, Table etc) 
o Bit Manipulation (Through XOR, OR, AND, NOT operator) 
o Sliding Window Mechanism (2 Pointers Approach) 

• Linked List

o Singly Linked-List 
o Doubly Linked-List 
o Circular Linked-List 

• Tree/Graph

o Depth First Search Algo (Implemented using Stack) 
o Breadth First Search Algo (Implemented through Queue) 
o Topological Sort Algo 

• Trie

Visual Flow-Chart of Coding Interview Cheat-Sheet

References :

https://leetcode.com/

https://hackernoon.com/

Finally, you are going to learn these approaches in my own way through my youtube video so that you can easily map the given set of problems with the appropriate data structure and algorithm. So, please like the video and share your valuable feedback. Last but not least, please don’t forget to subscribe my youtube channel. Cheers 🙂

General · Kubernetes · Linux · MAC

Kubernetes LittleSchool

Statement : Kubernetes is an open-source container-orchestration system for automating application deployment, scaling, and management. It was originally designed by Google, and is now maintained by the Cloud Native Computing Foundation.

Prerequisites : Though we have multiple vendors like Azure, AWS, CloudStack etc to setup kubernetes cluster in cloud but first we want to set it up on our local machine.

  • Install kubectl
brew install kubectl
kubectl version
  • Install MiniKube
# Please make sure you have virtual box installed on your machine.
brew install minikube
minikube version
# Start Minikube to create a kubernetes cluster
minikube start
# To stop a kubernetes cluster
minikube stop
# To check the Kubernetes CLuster Status whether it is running or not.
minikube status
# To check the Kubernetes Standard UI
minikube dashboard
# To delete a kubernetes cluster
minikube delete

Kubernetes Fundamentals :

First of all, we must understand the basic terminology of Kubernetes. In this, we would be using some of following terms very frequently –

  • kubectl : It is command line interface which helps us to communicate with kubernetes control plane (kubernetes master). The Kubernetes master is responsible for maintaining the desired state for your cluster.
  • Kube API : Kube API in the control plane takes care of all the commands issued by kubectl and in turn performs the CRUD operation against API objects.
  • Pod : Pod is the smallest unit in the context of Kubernetes. It could be the combination of one or more docker containers.
  • Node : Node is nothing but a physical or virtual machine which contains multiple pods in Kubernetes.
  • Scheduler : As name indicates, scheduler in the control plane helps pod to schedule and assign them to some node to run and the same information is sent back and forth to Kube API.
  • Controller : Controllers (Node, Replication, Endpoints controller etc ) in the control plane takes care of all the events happening through Kube APIs and respond them accordingly. Ultimately they control the scheduler.
  • Kube Porxy : This helps to create ip tables and provide access to the pods inside the cluster when any service or end point is created in the node. On the other hand, Kube DNS helps us to detect the service or end point created inside the cluster and then expose the service outside of the cluster.
  • Namespace : Namespace is the logical way to club multiple nodes together to divide cluster resources between multiple users.
  • ReplicaSet : By default, Pods are not fault tolerant and in turn ReplicaSets takes care of making the same number of pods in terms of it’s replica and makes pods scalable.
  • Ingress : Ingress takes care of forwarding the traffic and allows us to access the application running inside a node.
  • Volume : To make a system stateful Volume plays a vital role in Kubernetes and in turn saves the state of the container in case it is restarted or crashed.
  • Config Maps : A ConfigMap is an API object used to store non-confidential data in key-value pairs. 
  • Secrets : All the confidential data is stored inside secrets.
# To Create a Pod, Replica Set, Service, Deployment, Ingress, Config Map, Secret or Namespace.
kubectl create pod/rs/service/deployment/ingress/cm/secret/ns
# To Get all Pods, Replica Set, Ingress, Nodes, Persistent Volumes, Storage Class, Roles, Cluster Roles or Namespace.
kubectl get pods/rs/ing/nodes/pv/sc/roles/clusterroles/ns
# TO get everything as a part of specific Namespace.
kubectl --namespace <namespace_name> get all
# TO get everything
kubectl get all
# Execute a Pod having with specific image
kubectl run Pod_Name --image Image_Name
# To get the details of a particular pod
kubectl describe pod Pod_Name
# Enter into the  specific pod by executing bash command inside.
kubectl exec -it Pod_Name bash
# TO get the logs of a specific pod.
kubectl logs Pod_Name
# To delete a specific pod.
kubectl delete pod Pod_Name
# TO make any changes or to update any resource
kubectl apply
# To know the current context in terms of selected cluster.
kubectl config current-context
# To use the specific context in terms of selecting the cluster.
kubectl config use-context minikube
# To get all the clusters contexts
kubectl config get-contexts
# to expose a resource as a new Kubernetes Service.
kubectl expose
# Rolling Back to a Previous Revision.
kubectl rollout undo deployment
# Rolling Back to a specific Revision.
kubectl rollout undo deployment --to-revision=2
# Get the history of all the deployment
kubectl rollout history deployment
# To see the Deployment rollout status
kubectl rollout status deployment
# Set the image and record/save the annotation.
kubectl set image image_name --record

Now, you have the basic knowledge of Kubernetes and using the above commands you can perform your daily stuff if you are involved in any of projects which uses Kubernetes. Keep playing and I hope you would have enjoyed in Kube LittleSchool 🙂

Java · Mysql

Lambda Magic in Java 8

Statement : While working on Java Projects, we have to use Java Collections very frequently and there we use to struggle trying to convert one data structure into another. But if you have gone through some of the magic done in Java8 through Lambda, things would be very handy and easy going.

Collections Overview :

First of all, Java Collection interface extends Iterator interface which means that Java Collection uses index to retrieve the elements  next element as well to check whether more element are present or not. So, Java Collection is broadly divided into there categories –

  • List : ArrayList, LinkedList, Stack etc [ORDERED, DUPLICATE]
  • Set : HashSet, LinkedHashSet, TreeSet [UNORDERED, UNIQUE]
  • Queue : DeQueue (Heap)

In addition to it, everyone see Map interface also as a part of Java Collection but this is not the fact. Even, Map doesn’t support index and depends key-value pair which is not iteratable and in turn it can’t extends Collection which further extends Iterable.

  • Map : HashMap, TreeMap, HashTable etc.

Lamda Magic on Collections :

  • List to Set Conversion
List<POJO> originalList = new ArrayList<>();
Set<GetterMethodReturnType> set = originalList.stream().map(pojoObject -> pojoObject.getterMethod())
.collect(Collectors.toSet());
# POJO can be Car, Address, PersonDetails etc which would be having some of the attritubes with their setter and getter methods. 
# GetterMethodReturnType is the return type of the method. For ex. String, Integer etc.
  • List to Map Conversion
Map<DataType,DataType> nameMap = originalList.stream()
.collect(Collectors.toMap(dataTypeRef -> dataTypeRef , dataTypeRef -> dataTypeRef.getterMethod()));
# DataType can be Integer, Long, String and any POJO itself.
# dataTypeRef cab be the instance of the DataType.
  • One List to Another List Conversion
List<GetterMethodReturnType> convertedList = originalList.stream()
.map(pojoObject -> pojoObject.getterMethod())
.collect(Collectors.toList());

Commonly Used Operations on Data :

In our algorithm, we have to use the aggregation operation very frequently and most of the time we end up writing the logic for the same. But Lambda solves this problem with 1 or 2 lines of code.

  • To get the sum of the elements
int sum = originalList.stream()
.collect(Collectors.summingInt(pojoObject -> pojoObject.getterMethod()));
  • To get the average of the elements
int average = originalList.stream()
.collect(Collectors.averagingInt(pojoObject -> pojoObject.getterMethod()));
  • To get the min/max of the elements
int max = originalList.stream()
.collect(Collectors.maxBy(Comparator.comparing(POJO::getterMethod)));
int min = originalList.stream()
.collect(Collectors.minBy(Comparator.comparing(POJO::getterMethod)));
  • To get the count all the related elements
int count = originalList.stream()
.filter(pojoObject -> filterCondition).collect(Collectors.counting());

In this post, I haven’t covered everything related to Lambda but tried to focus on the important aspects of it. Enjoy coding 🙂 Cheers !!